This tutorial will show you how to create a website header that is similar to the new header at technorati.com. For this tutorial I will be using Adobe Photoshop CS2.
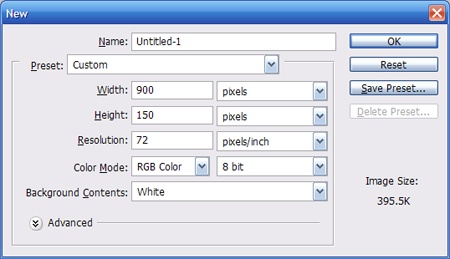
Start with a new document 900×150 pixels
Now create a new layer. Using the marquee tools, make a selection similar to the one below and fill it with black #000000.
Now create a new layer and make a selection about half the height of the rectangle you just created.
Now open the gradient tool and select the gradient below
Fill the selection with the gradient starting from the bottom to the top (like the arrow below).
Create a new layer. Make a selection with the rectangle marquee tool like below.
Use the following gradient settings
Now fill the selection with the gradient, start from top to bottom. You image should now look like the one below.
Create another new layer and make a selection with the rectangle marquee tool like the one pictured below.
Fill the selection with any color (a will use black). Right click on the layer in the layers pallet and select blending options. Apply the following blending options.
Here are the gradient settings
Apply the layer style. Your image should now look like the one below.
Use the text tool to add the link text. I used Arial 14pt for the font. The word “Home” is in black #000000. Everything else is the shade of green #46a407. You should space the words out so that they look like the image below.
We will now add the divider for the links. Create a new layer and use the line tool to draw two lines side by side. The first line should be #ababab and the second one should be #ffffff. I zoomed in to do this.
Now you can select the divider layer in the layers pallet. Right click it and select duplicate layer. This will make an exact copy of the line.
Now select the arrow tool and then click the duplicate layer. Position the lines in between the links using the arrow keys on the keyboard. Repeat the last two steps for each divider. Once all dividers are placed your image should look like this.
Now I will add a TeamTutorials logo. Create another new layer and use the rounded rectangle tool with a radius of 6px and a color of #54c400.
Create a new layer and select the shape tool. Use the four leaf clover (built in shape) with a foreground color of white #fffff. Draw a clover like below.
Select the clover layer and press ctrl+e to merge the layer down with the rounded rectangle layer. Apply a stroke of 2px to the rounded rectangle layer with #fffff as your color. Then I will add the words “TeamTutorials” using the font 42pt Sego. The color is white #ffffff. Technorati uses a slightly different font (neo sans), however, it is not freely available. Your image should turn out like the one below.
Now you can create a new layer and add your search box. Use the rectangle marquee tool and create a selection like below. Apply a 1px black stroke the rectangle.. Fill it with #ffffff. Add the advanced search text using Arial 14pt white.
You can then add your search button and any other touches. The final image should look like this.
Johnathan Ward is an experienced developer and consultant that writes tutorials to help other developers. In his day job, he is an IBM Watson Consultant with several years of experience deploying and customizing Watson Explorer solutions.

