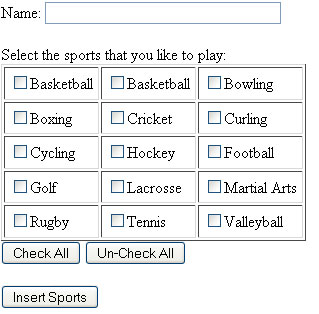
This tutorial will walk you through creating a basic HTML site with several checkboxes on it. Then it will show you how to use a single click on a button to check all objects and un-check all objects using JavaScript.
<SCRIPT LANGUAGE="JavaScript">
function SetValues(Form, CheckBox, Value)
{
var objCheckBoxes = document.forms[Form].elements[CheckBox];
var countCheckBoxes = objCheckBoxes.length;
for(var i = 0; i < countCheckBoxes; i++)
objCheckBoxes[i].checked = Value;
}
</script>
First we declare our JavaScript function so that we can call it later. The first line sets the language we are using followed by the declaration and naming of the function as well as arguments for the fcuntion. Everything enclose in the {} will be run everytime that script is called. The first line sets every object that is a checkbox in the form to a variable. The second line then sets the length (the count of checkboxes) to a variable. Finnaly it runs a for loop until I is greater than the variable (again, the count of checkboxes). Then we end the script.
<html>
<head>
<title>Sport Selector</title>
</head>
<body>
Then we have our basic HTML codes to start the file.
<form name="sports" method="post" action="insert.php">
Name:
<input type="text" name="username" maxlength="35" size="35">
<br /><br />
Select the sports that you like to play:
<table border = "1" cellpadding = "5">
Then we create the form and set where the submit will send us. (We will learn how to grab these values in a later tutorial.) We also add a textbox to allow the user to submit there name up to 35 characters. Finally we create a table to organize the checkboxes in.
<tr> <td><input type='checkbox' name=boxes[] value='Baseball' />Basketball</td> <td><input type='checkbox' name=boxes[] value='Basketball' />Basketball</td> <td><input type='checkbox' name=boxes[] value='Bowling' />Bowling</td> </tr><tr> <td><input type='checkbox' name=boxes[] value='Boxing' />Boxing</td> <td><input type='checkbox' name=boxes[] value='Cricket' />Cricket</td> <td><input type='checkbox' name=boxes[] value='Curling' />Curling</td> </tr><tr> <td><input type='checkbox' name=boxes[] value='Cycling' />Cycling</td> <td><input type='checkbox' name=boxes[] value='Hockey' />Hockey</td> <td><input type='checkbox' name=boxes[] value='Football' />Football</td> </tr><tr> <td><input type='checkbox' name=boxes[] value='Golf' />Golf</td> <td><input type='checkbox' name=boxes[] value='Lacrosse' />Lacrosse</td> <td><input type='checkbox' name=boxes[] value='Martial Arts' />Martial Arts</td> </tr><tr> <td><input type='checkbox' name=boxes[] value='Rugby' />Rugby</td> <td><input type='checkbox' name=boxes[] value='Tennis' />Tennis</td> <td><input type='checkbox' name=boxes[] value='Valleyball' />Valleyball</td> </tr></table>
Then we add all of our checkboxes and then end the table.
<input type="button" value="Check All" onclick="SetValues('sports', 'boxes[]', true);">
<input type="button" value="Un-Check All" onclick="SetValues('sports', 'boxes[]', false);">
<br /><br />
Then we add the two input buttons that will automatically uncheck and check the boxes for us. Notice the onclick values. We are calling the function that we set up earlier and “inject” the values into it. The Check All button sets the value equal to true and the uncheck all does them all to false.
<input type='submit' value='Insert Sports'>
</form>
</body>
</html>
Finally, we create our submit button and end the form and HTML file normally.
Once you save the file and open it, it should look like above. If you click the Check All button it will check the boxes and vice versa when you click the Un-Check All buton. This concludes this tutorial. I hope it was easy to follow. Thanks for reading.

