This tutorial will show you how to program a button that will add textboxes to your site without having to reload the page that you are one. To do this we will be using JavaScript. The code to do this is actually simple, and I will explain every little detail of it so you can understand how it works. Let’s get started on the code.
<html>
<head>
<title>Add Items To Invoice</title>
We start with our basic HTML tags to start a website.
<script language="javascript">
row_no=0;
Next, we declare that we are going to start a script and tell the browser what type and then we set a variable for us to use so we know how many boxes have been added by the user.
function addRow(tbl,row){
row_no++;
if (row_no<=20){
[/sourcecode]
Next we declare our function. A function is a set of code that is run every time you call it. You inject variables to it for it to use based on input from the user or the html file. Everything from here until you see the </script> tag is run every time we call this function in the HTML part of the document but only if the button hasn’t been pressed 20 times.
if (row_no<=20){
if (row_no>=10){
var textbox = row_no+'.)<input type="text" size = "2" maxlength= "2" name= quantity[]>';}
if (row_no<10){
var textbox = row_no+'. )<input type="text" size = "2" maxlength= "2" name= quantity[]>';}
var textbox2 = '<input type="text" size = "95" maxlength= "100" name= desc[]>';
var textbox3 = '<input type="text" size = "20" maxlength= "20" name= itemno[]>';
var textbox4 = '<input type="text" size = "6" maxlength= "6" name= ourcost[]>';
var textbox5 = '<input type="text" size = "6" maxlength= "6" name= cost[]>';
var textbox6 = '<input type="text" size = "3" maxlength= "3" name= distid[]>';
These lines declare the textboxes that will be added every time the button is clicked. The sample I am using here is for an invoice creation system. The user would click the button every time they needed to add a line (item) to the invoice. These lines are actually setting the JavaScript variables equal to the text (which in this case is HTML code). Notice the first line is controlled by an IF statement. This is so that the numbers line up. Without it the number that are double digit (greater than 9) wouldn’t be in line with the single digit numbers. Notice that the names of the boxes include brackets, which makes them an array. Every box that has that name will go to the same variable and allow us to call it when we receive this data.
var tbl = document.getElementById(tbl);
var rowIndex = document.getElementById(row).value;
var newRow = tbl.insertRow(row_no);
The first two lines here retrieve the information for the table and the current row of the table from the browser so the script knows where to put the textboxes. The third line create a new row in the table using the variable we declared earlier (which is currently 1).
var newCell = newRow.insertCell(0);
newCell.innerHTML = textbox;
These 2 lines of code simply create a cell in that row and inject the html of the variable that we declared into that cell which will intern display a textbox in that cell.
var newCell = newRow.insertCell(1);
newCell.innerHTML = textbox2;
var newCell = newRow.insertCell(2);
newCell.innerHTML = textbox3;
var newCell = newRow.insertCell(3);
newCell.innerHTML = textbox4;
var newCell = newRow.insertCell(4);
newCell.innerHTML = textbox5;
var newCell = newRow.insertCell(5);
newCell.innerHTML = textbox6;
We repeat this process for the other 5 boxes we will be inserting each time the button is pressed.
}
if (row_no>20){
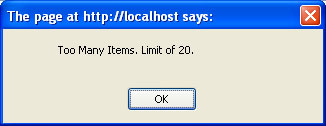
alert ("Too Many Items. Limit of 20.");
}
}
First we create the if statement. Next we create another if to see if the variable is greater than 20. If it is, show an alert telling the user that the limit has been reached. Then we close the If, and finally close the function.
</script>
</head>
<body>
Now we end the script and head and start the body of the HTML file.
<form name="invoice" method="post" action="insert.php">
Invoice #: <input type="text" size = "6" maxlength= "6" name="invoice" />
<input type="submit" value="Add Invoice">
<input type="button" name="Button" value="Add Item to Invoice" onClick="addRow('table1','row1')">
<table width="1000" border="0" cellspacing="0" cellpadding="2" id="table1">
<th><center>QTY</th>
<th>Item Description</th>
<th>Item #</th>
<th>OurCost</th>
<th>Cost</th>
<th>DistID</th></center>
<tr id="row1">
</tr>
</table>
First, we set up the form so that we can submit the values once they have been added. Then we add a textbox for the user to put in the invoce number that we are creating. (We will use this value when we collect this data to insert into the database). Next we create the button that will allow the user to add the items to the invoice and then the button to submit the values to the insert.php file. Notice the “onClick=”addRow(‘table1′,’row1’)” that is on the add item to invoice button. This calls the function we created and inserts the values in parenthesis into the arguments for the function. Then we create our table that these values will be injected into. Then we set up the heading of the tables so the users will know which boxes do what. Then we create the first row so the script will know where to start.
</form>
</body>
</html>
Then we close our form, body, and HTML. This complete the file.
This is what the site should look like when you go to it.
This is what should appear once you click the button to add an item.
You can continue to add items until you reach the limit (which we made 20) and then you will receive the above message. We will cover how to grab these values on the next page and insert them into the database in a future tutorial. I hope this was easy to follow and thanks for reading.


