You should not use this code on a production website.
Warning: This tutorial uses old techniques. It is insecure and will leave your server vulnerable to SQL Injection attacks.This tutorials also uses mysql_ functions that are no longer support. For updated tutorials look for a PDO or MySQLi tutorial.This post will be delete or revised in the future.
This tutorial will walk you through using PHP to select entries from a database based on the text that is entered into a textbox on the site. This guide will also walk you through making the insert script to insert the comments into the database as well as help you make the database.
First we need to create our database that we will be using. The following code will set our table that we will be using up automatically. **NOTE** change DBNAME and tutorial to the database name and table name respectively. As shown, I called my table tutorial, so for the sake of following this tutorial, you may want to do the same.
CREATE TABLE `DBNAME`.`tutorial` (
`id` INT( 4 ) NOT NULL AUTO_INCREMENT ,
`name` VARCHAR( 30 ) NOT NULL ,
`topic` VARCHAR( 30 ) NOT NULL ,
`comment` VARCHAR( 255 ) NOT NULL ,
PRIMARY KEY ( `id` )
) ENGINE = MYISAM
As you can see, this will create a table called tutorial on our database with 4 fields of data:
Id – Primary key and auto increment. (Will increase by one for every entry inserted)
Name – name of the user making a comment
Topic – A heading/title for the comment
Comment – The actual comment from the user.
Now that we have our table prepared, let’s insert a sample entry to it to make sure it is ok. Once you verify that, we are ready to start preparing our scripts to write and to read from the database. Let’s start with our insert script first. I called this file index.php.
<?php
$conn = mysql_connect ("localhost","dbname_username","password") or die ('cannot connect to database error: '.mysql_error());
mysql_select_db ("databasename");
The first thing in our file will be the connection string. This connects to our database. Make sure you insert you DBname, username, and password into the appropriate places in the string. You can now save the file and launch it in a browser. If the screen comes up blank the connection stream worked. If it throws an error, it will tell you the error and you will need to troubleshoot it.
$name = $_POST['Name'];
$topic = $_POST['Topic'];
$comment = $_POST['Comment'];
Next we declare the variables that we are going to use. We will make a form in the php file later that will store these variables on submit. As you can see, we have a variable for the name, the topic, and the comment.
if (isset($name) && isset($topic) && isset($comment))
{
This line checks to see if all of the variables that we need have indeed been set. This allows the page to see whether the user has already inserted data, or if this is the first time the page has been loaded.
if(($name=="") || ($topic=="") || ($comment=="")) {
echo 'One or more field has been left blank. Please use your browser back button and correct this. Thank-you.';
die ();
}
This section runs if the variables are set. Just because they are “set” does not mean they contain information. This snippet checks for there to be valid characters in all the variables. If there is not, it throws an error and ends the PHP so that erroneous data is not entered into the database.
$sql = "INSERT INTO
`DBNAME`.`TABLENAME` (`id`,`name`, `topic`, `comment`)
VALUES (NULL,'".$name."','".$topic."','".$comment."');";
mysql_query($sql);
$commentno = mysql_insert_id();
This code inserts the values they entered into the fields into the database. Again, make sure your DBNAME and TABLENAME are properly inserted into those places. The last line returns the primary key (the one that is set to auto increment) so that we can display the comment number to the user.
echo 'You comment has been successfully submitted with the following values: <br />';
echo "<br /><B>Comment #:</B> $commentno";
echo "<br /><B>Name:</B> $name";
echo "<br /><B>Topic:</B> $topic";
echo "<br /><B>Comment:</B> $comment";
echo '<form method="post" action = "index.php">';
echo '<Input Type="SUBMIT" value="Submit Another?"></form>';

}
This code simply displays the values back to the user in formatted text so they can see that there comment went through the way they intended. The submit button simply redirects to the same page so that you can insert another comment if you would like. When you click the button and reload the page it will clear the variables. If you just reload the page it will keep submitting the variables to the database. The trailing end bracket ends the If statement.
else{

echo '<h2>Please leave us your comments: (All Fields Are Required)</h2>';
echo '<form method="post" action="index.php">';
echo 'Your Name: <br /> <INPUT TYPE="TEXT" NAME="Name" size="35" maxlength = "30"><br /><br />';
echo 'What is your comment about?: <br /> <INPUT TYPE="TEXT" NAME="Topic" size="35" maxlength = "30"><br /><br />';
echo 'Comment: <br /> <TEXTAREA NAME = "Comment" rows="7" cols = "35"></textarea><br /><br />';
echo '<INPUT TYPE="SUBMIT" VALUE="Submit Comment"> <br /><br />';
echo '</form>';
}
?>
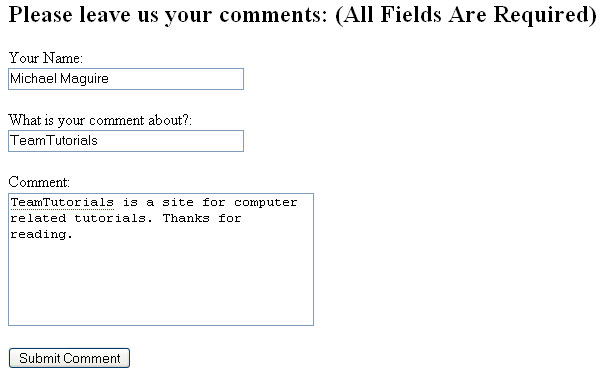
This is the else statement that runs if the first IF statement if not true (the ISSET one). It simply shows the form to the user and tells it to reload this page on submit. Note how the names of the input boxes are the same of the variables that we declared in the first sections. Now you should be able to run you file and use it to submit a comment.
You should see the form that we created since none of the variables have been set yet. Fill out the form saying whatever you would like it to say and hit submit.
When you hit submit, the form should simply reload the page and you should be greeted with the success message. Submit several different types of comments so that when you run a select later you can see that it is functioning the way that it should.
Now we need to make our file that will pull the data back from the database for us. We are going to make it so that we can put the text that we are looking for into a textbox and pull the data back based on that. I called this file lookup.php
<?php
$conn = mysql_connect ("localhost","dbname_username","password") or die ('cannot connect to database error: '.mysql_error());
mysql_select_db ("databasename");
This file starts off with the connection string again. It should be identical to the first one as it is pulling from the same database that we were inserting to.
$method = $_POST['method'];
$text = $_POST['string'];
Then we have our variables. This time we only have two to work with; method and text. Method is going to tell the query where to look for our text (name, topic, comment, or id). The text is going to be the text that we are looking for within that column.
if (isset($method) && isset($text)){

echo '<table cellspacing="2" cellpadding="6" border = "2">';
echo '<tr>';
echo '<th style="text-align:left;">ID #</th>';
echo '<th>Name</th>';
echo '<th>Topic</th>';
echo '<th>Comment</th>';;
echo '</tr>';
This section simply checks for the variables to be set and sets up the table to show our results once the query is ran.
$sql ="select * from `tutorial` where $method like '%$text%'";
$query = mysql_query($sql);
This is the select statement to pull the data from the database. Note that the where clause contains the variable $method. This variable is whatever is picked from the drop-down menu that we will be creating. Also, notice how we are using like instead of the equal sign. This tells the database to look for that text in ANY part of the field. It is not case sensitive either.
while ($row = mysql_fetch_array($query)){
echo "
<tr>
<td>".$row['id']."</td>
<td>".$row['name']."</td>
<td>".$row['topic']."</td>
<td>".$row['comment']."</td>
</tr>";
}
}
This bit of code simply sets the variable to the query that was just ran and echo’s the variables that were returned by the previous query until the variable no longer contains information. The first close bracket ends the while loop and the second ends the IF statement.
echo '<h2>Enter your search criteria</h2>';
echo '<form method="post" action="lookup.php">';
echo 'Search which area? <br /> <SELECT NAME="method"><br /><br />';
echo '<option value="id" style="text-align:left">id </option>';
echo '<option value="name" style="text-align:left">name </option>';
echo '<option value="topic" style="text-align:left">topic </option>';
echo '<option value="comment" style="text-align:left">comment </option></select> <br />';
echo 'Search for what? <br /> <INPUT TYPE="TEXT" NAME="string" size="35" maxlength = "30"><br /><br />';
echo '<INPUT TYPE="SUBMIT" VALUE="Search">';
echo '</form><br /><br />';
echo $sql;

?>
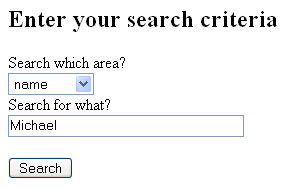
This final bit of code simply creates our form to fill out that will allow us to create the selection stream. It sets up the HTML form to go back to this page on submit. Then it creates the drop down with the options of ID, name, topic, and comment. Then it creates an input box for you to type the text that you are trying to locate. Then it gives us the submit button. Finally it shows the query that was run in order to retrieve the results. I did this so that you can see what the query looks like when it is run. This completes this form. You should now be able to launch the form.
The above form will be displayed. Pick what you would like to search in. In the picture above I am looking for comments that were submitted by a person who entered Michael somewhere into the name box.
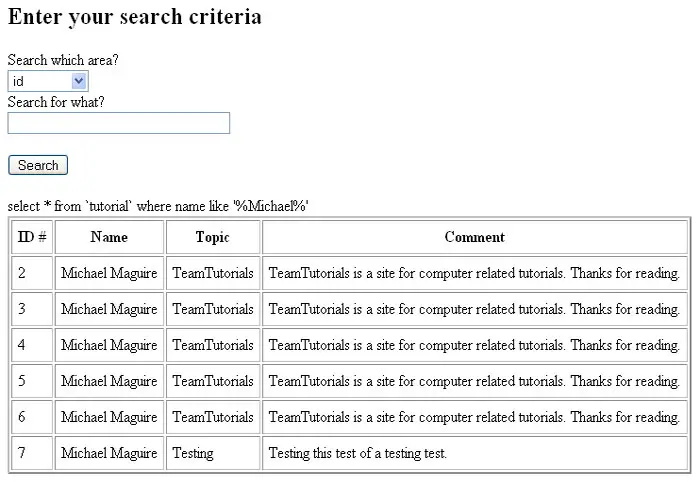
This picture shows all the results of the options that I selected. Take note of the query that is displayed right above the table so you can see what the query actually looks like. This form is set up to show you the selection boxes on the results page again so that you can keep looking for multiple things. This concludes this tutorial. I hope it was easy to follow and will benefit you in some way. Thanks for reading.


