This tutorial will walk you through configuring windows XP (look for the Vista tutorial later) to act as a kiosk mode without needing to buy additional software. There is software available that will do most of the options that we are going to cover for you, but they cost money.
First thing you should do is ensure your system is up to do with all Windows Updates (for security reasons). The next thing we are going to do is to create a user for us to use for this task. Let’s get started.
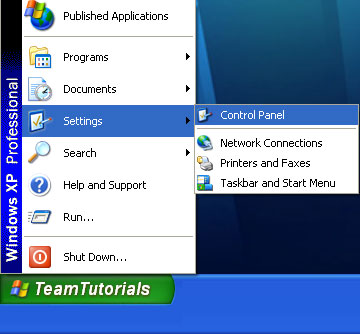
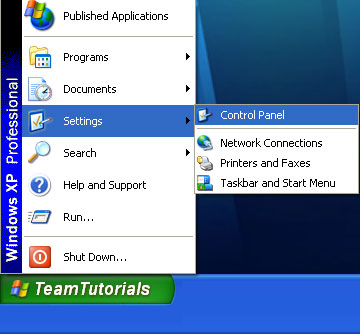
Click on Start (note that my start button says “TeamTutorials”) select Settings and click on Control Panel.
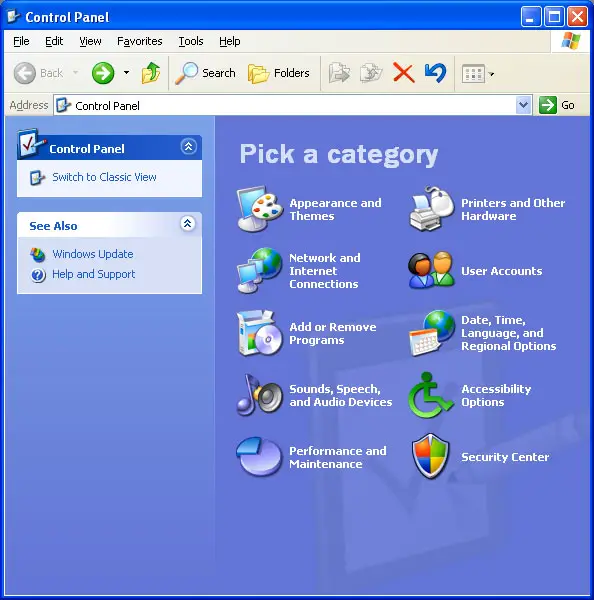
If you control panel looks like this, click on “Switch To Classic View” to get the old style control panel. If you already have the old control panel, continue on.
Double Click on User Accounts.
Select “Create a New Account” from the window that pops up.
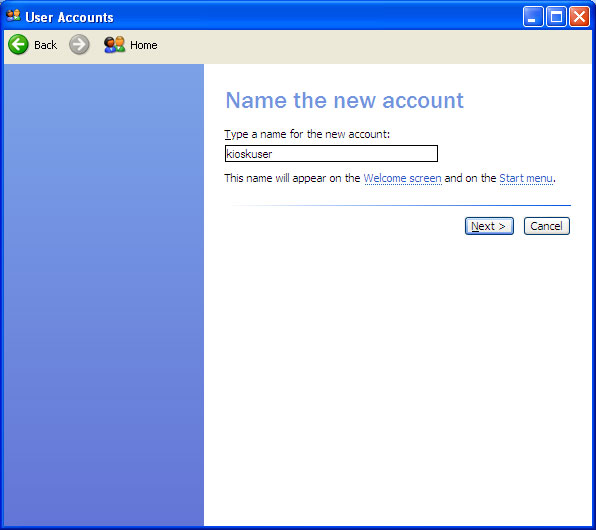
The first window that pops up will want you to name the user. I am going to call my user “kioskuser”. This will allow me to remember what that user is for if I do other things on this machine as well. Once you have typed in the name for your user, click on next to continue.
Next, it wants you to pick the type of account the user will have. Go ahead and give them administrator access. We are going to disable things that will allow them to change it anyway, so it won’t be a big deal. Once you check the Computer Administrator option, click on Create Account.
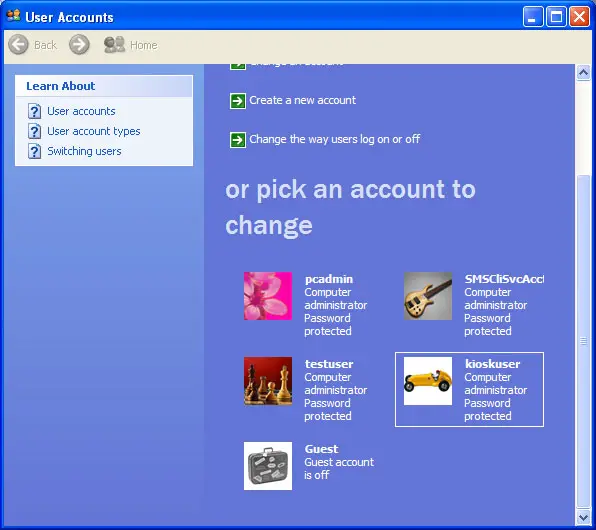
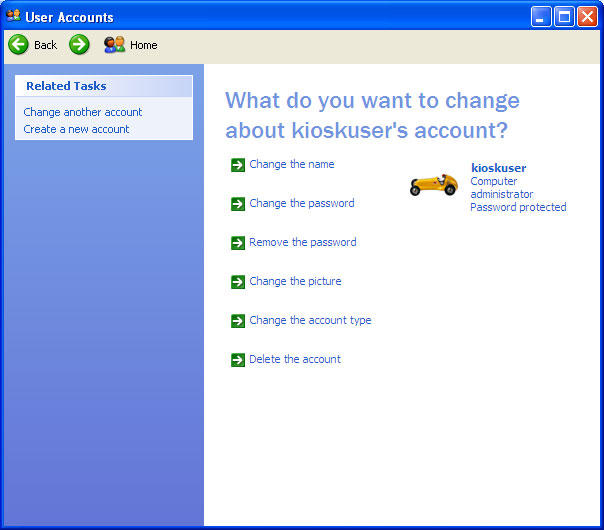
Windows will now take us back to our user screen. You will now see the user we just created. Click on the users name to open the option for that user.
This window will pop up. Click on “Change the Password” to set the new password for the user. You may also want to make sure that any other accounts on the computer are password protected to prevent someone from using those accounts easily.
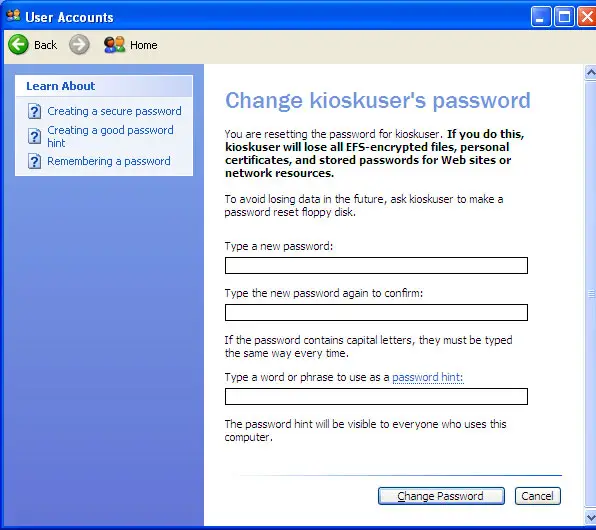
Pick a password for your user that you will be able to remember. Type the password in the top box and the second box. You can type a reminder of the password in the hint box if you wish. Click on Change Password to continue on once you are done inserting data into the fields. You can now close the user window but keep the control panel window open and select the System icon. We are now going to turn off error reporting, stand-by, hibernation, and some other features.
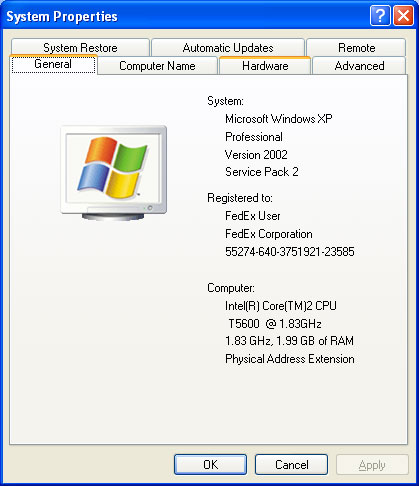
The above window will pop up. Click on the advanced tab.
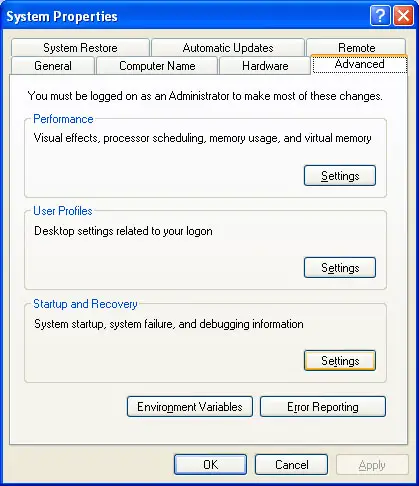
This tab should look like above. Click on the error reporting button on the bottom.
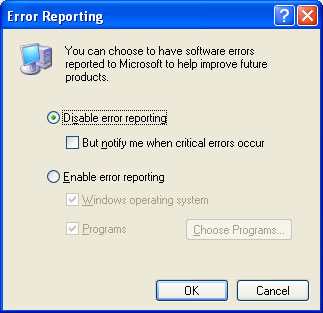
Check the radial button that says disable error reporting. Click on OK and you should now be back to the System properties under the advanced tab. Click on the settings button under the “Startup and Recovery” section.
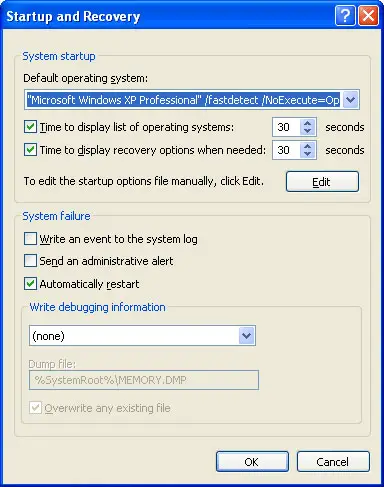
Make the window that appears look like the one pictured above (by checking and un-checking boxes and changing settings.) Once you are done, click on ok. You are now back to our system settings. Click on the Remote tab at the top of the window.
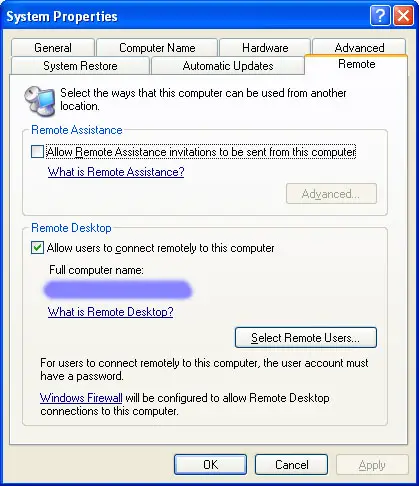
Make sure that the “Allow Remote Assistance Invitations to be sent from this computer” option is unchecked.
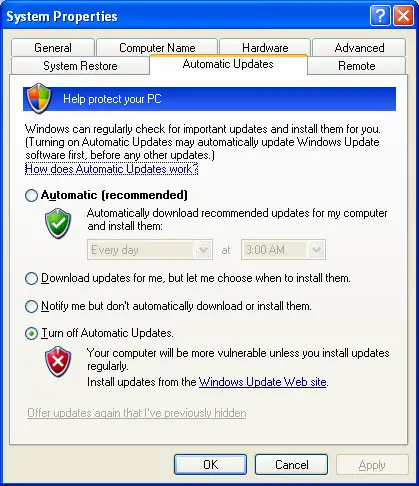
Now select the Automatic Updates tab and make sure the “Turn Off Automatic Updates” option is selected. We are now done with system settings. Now, lets log off of our current setup and log on with our new user that we have created. This will give us a new desktop with no icons, and allow us to make our changes to the registry that are user specific. [HKEY_CURRENT_USER]. Once logged in as “kioskuser” we need to set the background, screensaver, and power settings to the options we want to have enabled. We will now turn off hibernation.
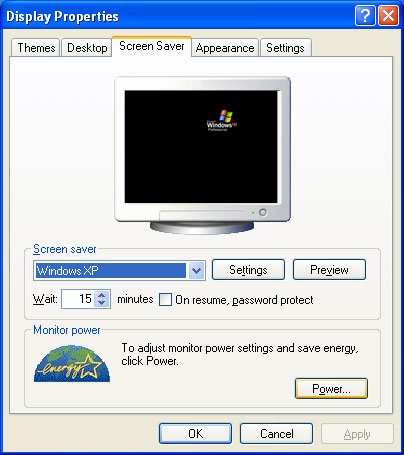
Click on Start->Settings->Control Panel. Double-click on display. (Alternatively, you could right-click on the desktop and select properties from the drop-down menu). In these menus are all the option for how your desktop looks. You can set up all these options however you would like. There are three options within here that should be done though.
The first one is to turn off all power management (turn off monitor, turn off hard drives, ect..). To do this select the Screen Saver tab and click on the Power button.
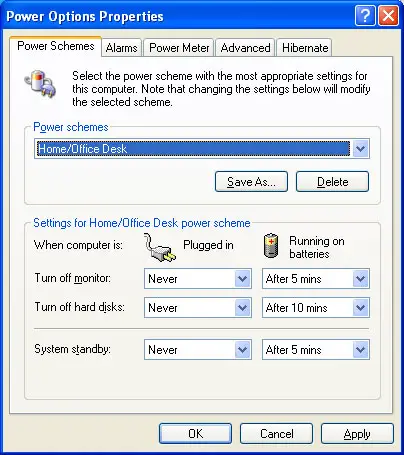
Set all three options (Turn off monitor, turn off hard disks, standby to never). Note that I have on battery options as I am on a laptop. You can ignore those settings. Now click on the advanced tab.
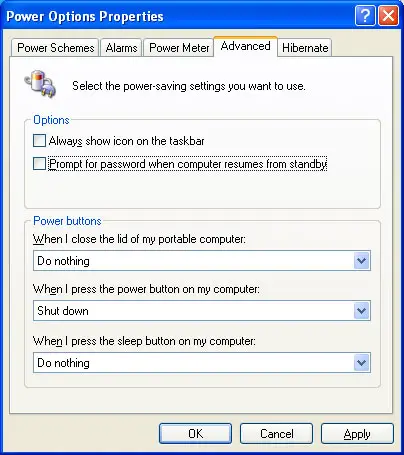
Make your selections in the advanced window look like mine (again, ignore the laptop specific “When I close the lid of my portable computer” option). This will make it so that to shutdown all you need to do is simply press the power button once.
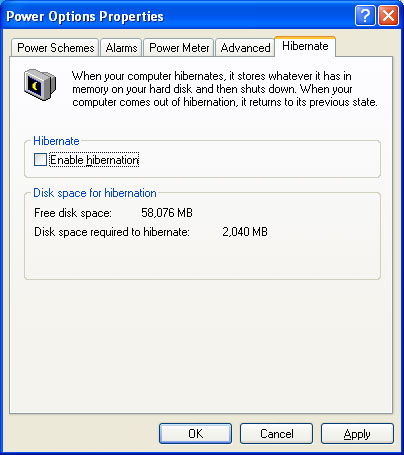
Now, click on the hibernation tab and ensure that it is disabled.
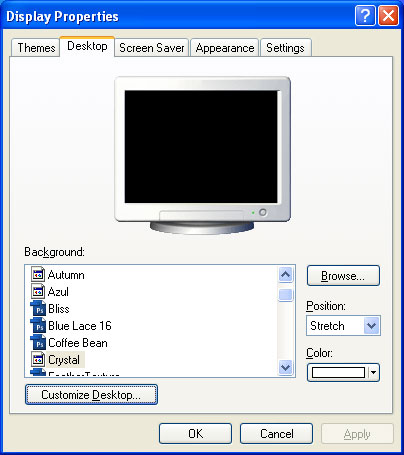
Finally select the Desktop tab and click on the Customize Desktop Button
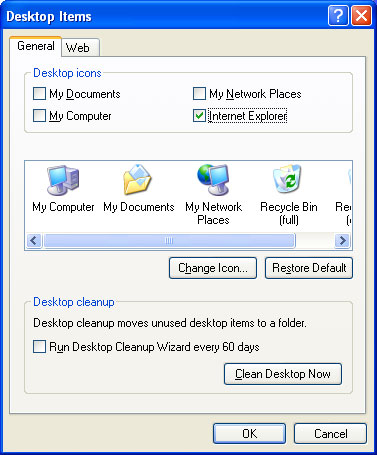
Uncheck all icons except internet explorer. This will remove all icons from the desktop.
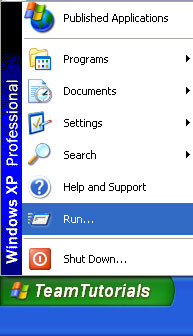
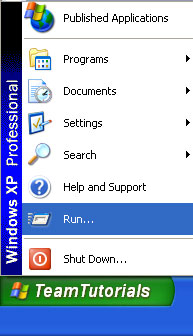
Click on start and select run.
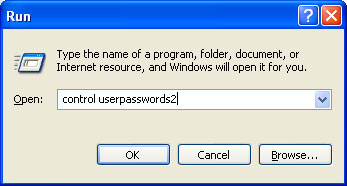
Type in “control userpasswords2” (without the quotes) and press enter or click OK.
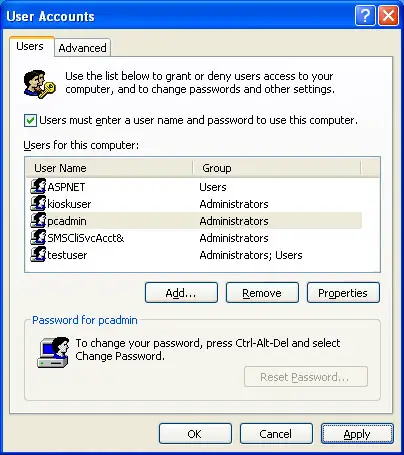
Select kioskuser and then uncheck the checkbox and click apply.
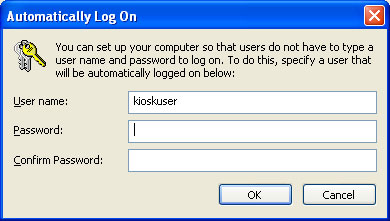
Type in your password for kioskuser twice and click OK. If the window goes away with no errors, all is ok. Close the user(s) window(s). Now we need to modify the registry to prevent users from moving the task bar, right-clicking on the taskbar, right-clicking on the desktop, and disable the Windows logo keys.
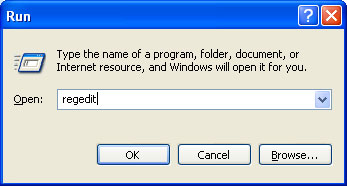
Click on start and select run.
Type in regedit and press enter.
To disable windows logo keys:
Navigate to:
HKEY_LOCAL_MACHINE\SYSTEM\CurrentControlSet\Control\Keyboard Layout
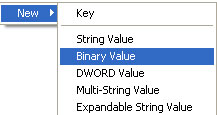
In the right pane, right-click and select New and then click on Binary Value. Name the value “Scancode Map” without the quotes.
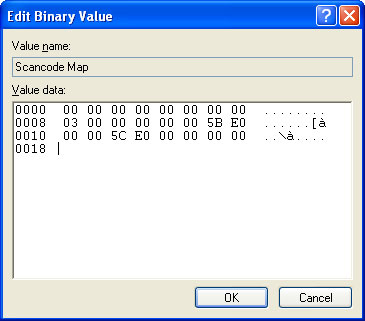
Double-click on the value and enter in the following data:
00 00 00 00 00 00 00 00 03 00 00 00 00 00 5B E0 00 00 5C E0 00 00 00 00
(Please note that you will NOT be able to copy paste this into the form. You will have to type it in manually. The window will add characters to either side as you type as well, this is normal for this type of registry key. Also, this disables the windows logo keys for all users on the computer, not just kiosk user.)
To disable right-click on taskbar (you should move the tasbar off the screen so that they can’t see the start menu.
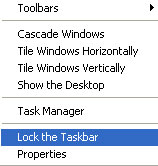
Right-click on the taskbar and un-check lock the task bar. You should now be able to hover over the top of the taskbar until you get a double sided arrow. Once you get the arrow, click and drag down, to remove the taskbar altogether. Once it is down all the way, you will notice that you can’t lock it in this position. We can however use the registry to lock it in this position.
Now navigate to:
HKEY_CURRENT_USER\Software\Microsoft\Windows\CurrentVersion\Explorer\
Advanced
Right-click in the right pane and create a new dword key and call it “TaskbarSizeMove” without the quotes.
Double click on the key and put in a 0 (default).
Note:
You should configure your computers BIOS to prompt for a password upon entering and also ensure that your hard drive is set to the first boot priority. This will make sure no one boots to a floppy or flash drive to compromise your system. Also, this will prevent them from changing settings in the BIOS themselves. I am not going to explain this in excruciating detail due to the numerous motherboard and BIOS manufacturers. Please refer to your manufacturer and/or motherboard documentation. If you have specific questions, please leave a comment.
Next we need to enter the rest of our registry keys to lock down the system a little more.
First, we are going to disable the ability to right-click on the taskbar.
Navigate to the following:
HKEY_CURRENT_USER\Software\Microsoft\Windows\CurrentVersion\Policies\Explorer
Right-click and create new DWORD named “NoTrayContextMenu”
Set the value of the key you just created to 1.
Next, we are going to disable right-clicking on the desktop.
Navigate to the following: Navigate to HKEY_CURRENT_USER\Software\Microsoft\Windows\CurrentVersion\Policies\Explorer
Right-click and create new DWORD named “NoViewContextMenu”
Set the value of the key you just created to 1.
That is the last step. Now you should be able to reboot your machine and it will auto login the kisokuser. The user will not be able to move the taskbar, use the windows logo keys, right-click on the desktop, or right-click on the taskbar. Sorry for the length of this tutorial, but I hope it helps you. Thanks for viewing. Any additional questions or comments, please feel free to leave a comment.

