This tutorial will walk you through checking for an e-mail to be valid as the user is filling out the form without having to reload the page. Bear in mind, that there is no way to make sure that we get an accurate working e-mail every time. All we can do is prevent users from using extremely random ones or for domains that don’t exist. I was working on a form for a new website that is going to require users to create an account and was browsing the web to see what people use to validate e-mails, other than the obvious choice of running it through a reg-ex (regular expression), and I came across a site that showed me a feature of php that can be useful. The original post can be found over at David Walsh’s website. I think that using that this php function as well as a reg-ex and running them from an AJAX call should do the trick. So let’s get started. You can get the images we will be using here. First we will make the form that will call the functions. Since this will be our user account creator we’ll call it adduser.php. (I’m leaving out the default HTML/CSS as you can do that however you like – you may also note that this file could be an HTML as there is no php in this section – this is just a part of the much larger file that I am working with (-:).
<script type="text/javascript" src="includes/js/validate_email.js"></script>

<form method="post" action="register.php" name="user">
<h2>User Creation</h2>
UserName (Display Name):<input type="text" name="display_name" id="display_name"/> <br />
First Name:<input type="text" name="fname" id="name"/><br />
Last Name:<input type="text" name="lname" id="surname"/><br />
E-mail:<input type="text" name="email" id="email" onBlur="checkEmail()"/><div id="emailflag" style="display:inline;"><img src="images/failure.gif"></div><br />
Password:<input type="password" name="pass" id="pass"/>
Confirm PW:<input type="password" name="pass2" id="pass2" />
<br  />
</form>
Only a few things to note here: the onBlur command in the e-mail textbox is the first. This is going to call the email function (which is included in the script include at the beginning of the file) every time that textbox is tabbed or clicked away from. Also, note the div after the textbox, that contains the failure image now as we will use that ID to change the image later. Next, we need to create the php file that will actually do the validation when the AJAX calls it. Let’s call this file validate_email.php. I’ll break this one down a little to explain what’s going on.
<?php
if (isset($_GET['email'])){
	isValidEmail($_GET['email']);
}
This couple of lines simply checks for a variable to be set and if it is, calls the function to validate the address – this will prevent from someone going straight to this file or going to it with a blank string. As you can see we pass the value in the variable to the function.
function isValidEmail($email)
	{
	$myReg="/^[A-Za-z0-9\._-][email protected][A-Za-z0-9_-]+\.([A-Za-z0-9_-][A-Za-z0-9_]+)$/";
		if(preg_match($myReg, $email)){
			if(domain_exists($_GET['email']))
			{
				echo("<img src=\"images/success.gif\">");
			}
			else
			{
				echo("<img src=\"images/failure.gif\">");
			}
		}
		else
		{
			echo("<img src=\"images/failure.gif\">");
		}
	}
The function looks worse than it actually is due to the reg-ex. They can be a little confusing, but once you understand what it does, it’s not that bad….but that is another tutorial. For now just know it checks the string that is passed to it to be formatted correctly. First we set the reg-ex and then we pass the address to it through the preg_match command. This will process the string to match the reg-ex and output true or false. If it passes validation, we then pass it to our function to check the MX record. If that passes we echo the path to success.gif (which is a green check-mark), otherwise we echo the path to failure.gif (which is a red x). Note that for these to work you will need to put the images in the proper locations or change the path to the images. Finally, in this file we need to create the domain_exists fcuntion that we called in the above section of code.
function domain_exists($email,$record = 'MX')
{
	list($user,$domain) = split('@',$email);
	return checkdnsrr($domain,$record);
}
?>
This simply runs the e-mail(after splitting the email at the @ symbol) through the checkdnsrr which checks for the MX record to be retrievable from the domain name. This essentially just checks for a server to be responding at that domain name. Technically we could still put an e-mail that doesn’t exist, as all we check is for the domain to exist. Next, we need to create the AJAX call file. We’ll call this file validate_email.js.
function checkEmail(){
	httpObject = getHTTPObject();
	if (httpObject != null) {
		if (!document.getElementById('email').value== ""){
			httpObject.open("GET", "../includes/php/validate_email.php?email="+document.getElementById('email').value, true);
			httpObject.send(null);
			httpObject.onreadystatechange = setImage;
		}
		else
		{
			document.getElementById('emailflag').innerHTML = "<img src=\"images/failure.gif\">";
		}
	}
}
This file has 3 functions in it. The first one is the function that we are calling from the form in the first file. This function calls the getHTTPObject function to initialize the AJAX call that we will use. Next, we check for the email field in the form to contain information and if it does, we do an HTTP GET request to call the php file and pass it the email that is currently in the textbox. If it contains no data it sets the div that is created right after the textbox to contain the failure image. Once the HTTP object state changes, we call the function that will pass the image contents.
function getHTTPObject(){
if (window.ActiveXObject) return new ActiveXObject("Microsoft.XMLHTTP");
else if (window.XMLHttpRequest) return new XMLHttpRequest();
else {
alert("Your browser does not support AJAX.");
return null;
}}
This function declares the httpObject that we will be using and throws an error in the browser if it does not support the call.
function setImage(){
if(httpObject.readyState == 4){
document.getElementById('emailflag').innerHTML = httpObject.responseText;
}}
This final function checks for the state of the object to be 4 (completed) and if it is it sets the innerHTML of the ID from the form to whatever was echoed from the PHP file (either the success or the failure gif). That completes the files. Ensure that all the files are in the right place. I have my php file in /includes/php/validate_email.php and the javascript file is /includes/js/validate_email.js.
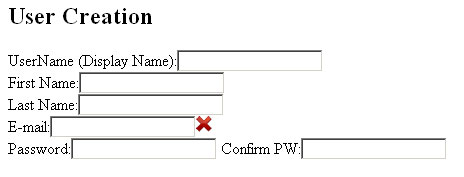
This is the form that should be shown when you go to the main form.
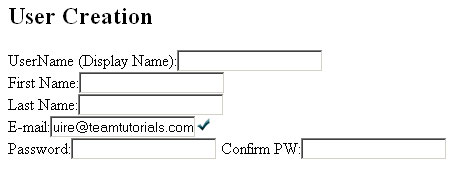
When you type a valid e-mail into the e-mail box, the checkmark should appear where the X was like above.
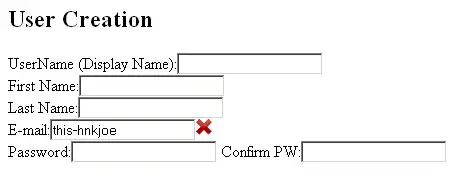
If you put in a improperly formatted e-mail like above, it should switch it back to an X. It will also go back to an X if you blank out the text box.
That completes this tutorial. Some of this can be hard to follow so please leave any questions or comments you have in the comments sections and we’ll help you out where we can. Also, I made the reg-ex fit as many things as I could, if you find a valid e-mail that it fails, please let me know so that I can modify it to work. Thanks for viewing this tutorial and I hope it was easy to follow.


