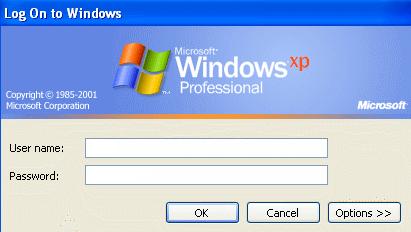
This tutorial will walk you through the process to change the image that is displayed on the logon screen as shown below:

NOTE: The steps outlined in this tutorial are to be followed at your own risk. We have tested it and it does work, but if you do something wrong your machine may become inoperable. I am doing this on a Windows XP Professional machine with Service Pack 2. I will alert you when something needs to be done slightly different (for home version instead of professional). There are steps at the end of this tutorial to revert your machine back to normal if something goes wrong. Please check them before you reboot to test your work, so you know how to fix it if something goes wrong.
To do this we will have to modify system files, so first please follow the tutorial that shows you how to show hidden system files.
To complete this tutorial we will need to use a tool called a Hex Editor and/or a Resource Editor. These tools allow us to modify files that have already been compiled into DLL’s or EXE’s. A very good one to do this, that is free, is Resource Hacker and can be acquired by going to ResHackers Website. Scroll down on the page until you see the link to download the file as below:


Save the file to disk once the download screen appears. Once the download has completed, open the file (which is zipped and you will need to unzip it before use).

You should now have the above folder on your desktop (or wherever you extracted the files to).

You should see the above files within the folder. ResHacker.exe is the executable that we will be running. Now we need to prep things for the image swap. We will need to pick images that we will be using to replace these files. In order for it to work we will need two different sizes of the same picture:
1.) 413×72
2.) 413×88
They should be the same image, just resized to fit. If the files are not this size, your computer will not boot properly and will throw an error. Please ensure that your file sizes match. They also have to be saved as 24-bit bitmaps to be functional.

Now we can open ResHacker and goto File->Open. Browse to My computer -> C Drive -> Windows -> System32 -> and the look for the file called “msgina.dll” and open it.

You reshacker should now look similar to the above screen shot. What you are now looking it is the contents of the dll. As you can see this DLL contains icons, bitmaps, dialogs, and more. You are able to modify all of these with this tool but PLEASE BE CAREFUL. You can seriously cripple your machine if you don’t take care.

Extend the Bitmap category to see the above listing.

You will need to upload your files to 101 (413×72) and 107(413×88) for Windows XP Professional.

You will need to upload your files to 128 (413×72) and 129 (413×88) for Windows XP Home.

Right click on the “1033” under the number file we need to replace, in this case we are using 101 which is our 413×72 image.

You will now get the upload screen. Click on the “Open file with new bitmap” button.

Use the file location box to browse to our smaller sized image that we are using and double click on it to open it. In this case it is on my desktop and is called small.bmp Then make sure that 101 (or 128 for XP Home) is selected in the textbox and the click on “Replace”.

You should now see you new image when you select that number in ResHacker. Repeat this process for 107 (129 for XP home).

Then you should see your new image when you select that number as well.

In ResHacker go to File -> Save As.

Make sure you are in “C:\WINDOWS\System32\ and then save the file as msgina1.dll. This way IF something were to go wrong, we still have out original msgina.dll to revert to if need be. Now that we have our new file, we need to tell windows to use it instead of the original. To do this we will need to modify the registry a little bit.

Goto Start-> Run and type regedit, this will bring up the registry editor. Hit the plus signs next to the words to navigate through to:
HKEY_LOCAL_MACHINE\SOFTWARE\Microsoft\Windows NT\CurrentVersion\Winlogon

Once you select the WinLogin folder, you registry editor should look similar to the above shot.

Right click on a blank spot in the right pane and goto new and then select String.

Name the key “GinaDLL” and press enter.

Now, double-click on the key and set the Value Datq equal to:
Then select “OK”.
Once you restart your computer, you should see you login screen image that you selected.
IF your computer gives an error about not able to initialize the file, please start in safe mode (Press F8 while booting, and select Safe Mode) Once in safe mode, launch the Registry Editor and delete the string we created above and it will go back to normal. If this happens to you, please contact me and let me know. I am working on a fix for it, but it seems to happen when it feels like it, and I can’t find the cause. Thank-you for reading.